Typography & Fonts
Essence
Ghost offers multiple ways to customize the fonts used in your theme. You can either use Ghost’s built-in typography settings or add custom fonts manually.
Default fonts
The theme ships with self-hosted variable fonts:
- Body: Inter — used for post content and general text
- Headings: Oswald — used for titles, navigation, buttons, and UI elements
These load from the theme bundle. Ghost’s Custom Fonts settings override them when you pick fonts in the admin.
Ghost Typography Settings
Ghost provides built-in typography customization through the admin panel. Here’s how to access these settings:
- Go to Settings → Site → Design & branding
- Click Customize
- Change fonts in Typography section
You can change both heading and body fonts using Ghost’s native interface. the theme reads Ghost’s --gh-font-body and --gh-font-heading CSS variables, so your selections apply site-wide.
To restore the theme defaults, set both Heading font and Body font to Theme default in Ghost Typography settings.
If you want fonts not available in Ghost’s curated selection, add them manually using Google Fonts or self-hosted files.
Using Custom Google Fonts
Code Injection is required to add custom CSS.
- Open the Google Fonts website and select the font you want to use. For example, we will use Roboto for body and Oswald for headings.
- Add these fonts to collection using the Get font button
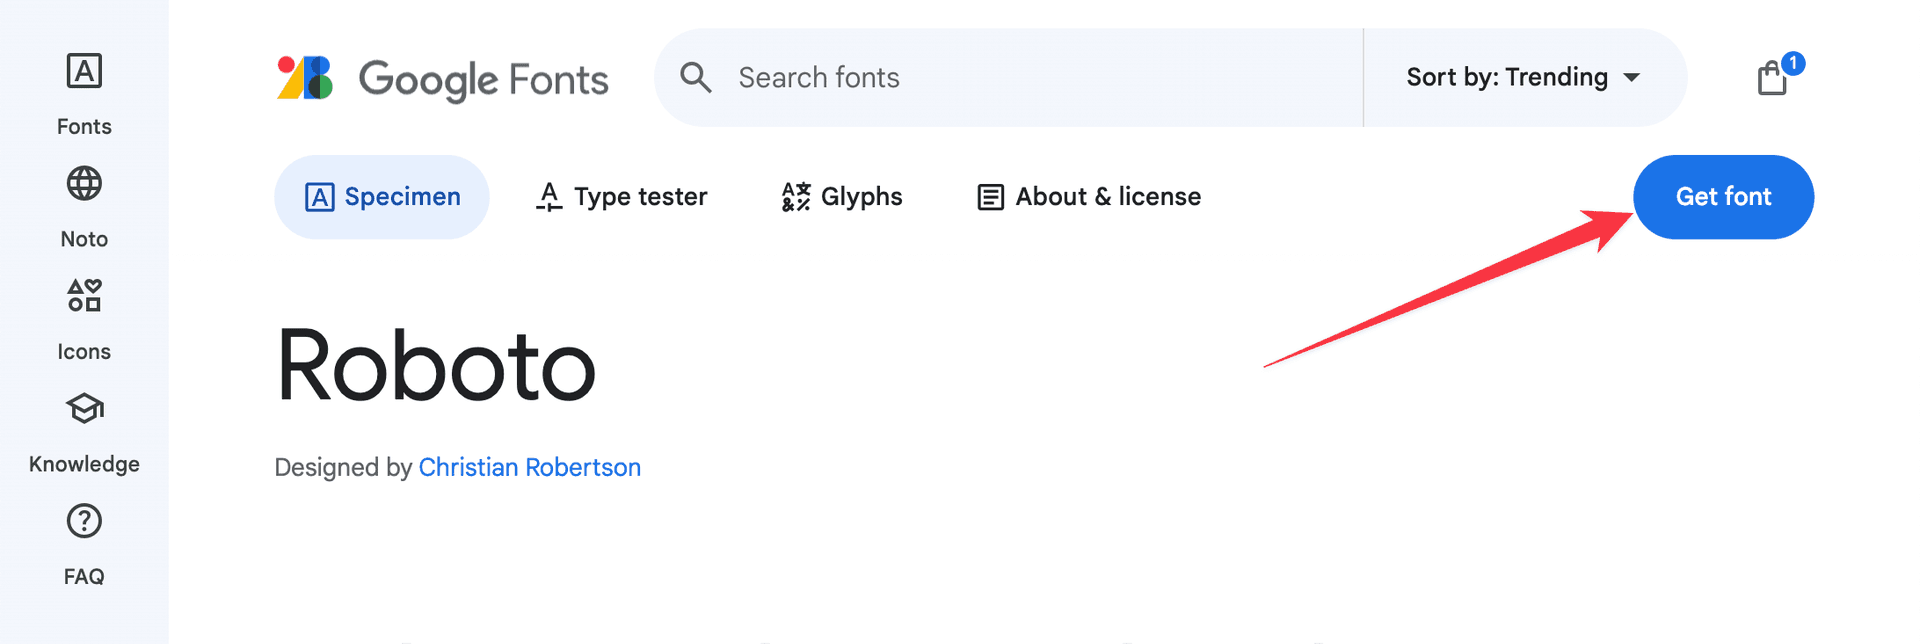
- Click on the Get embed code button
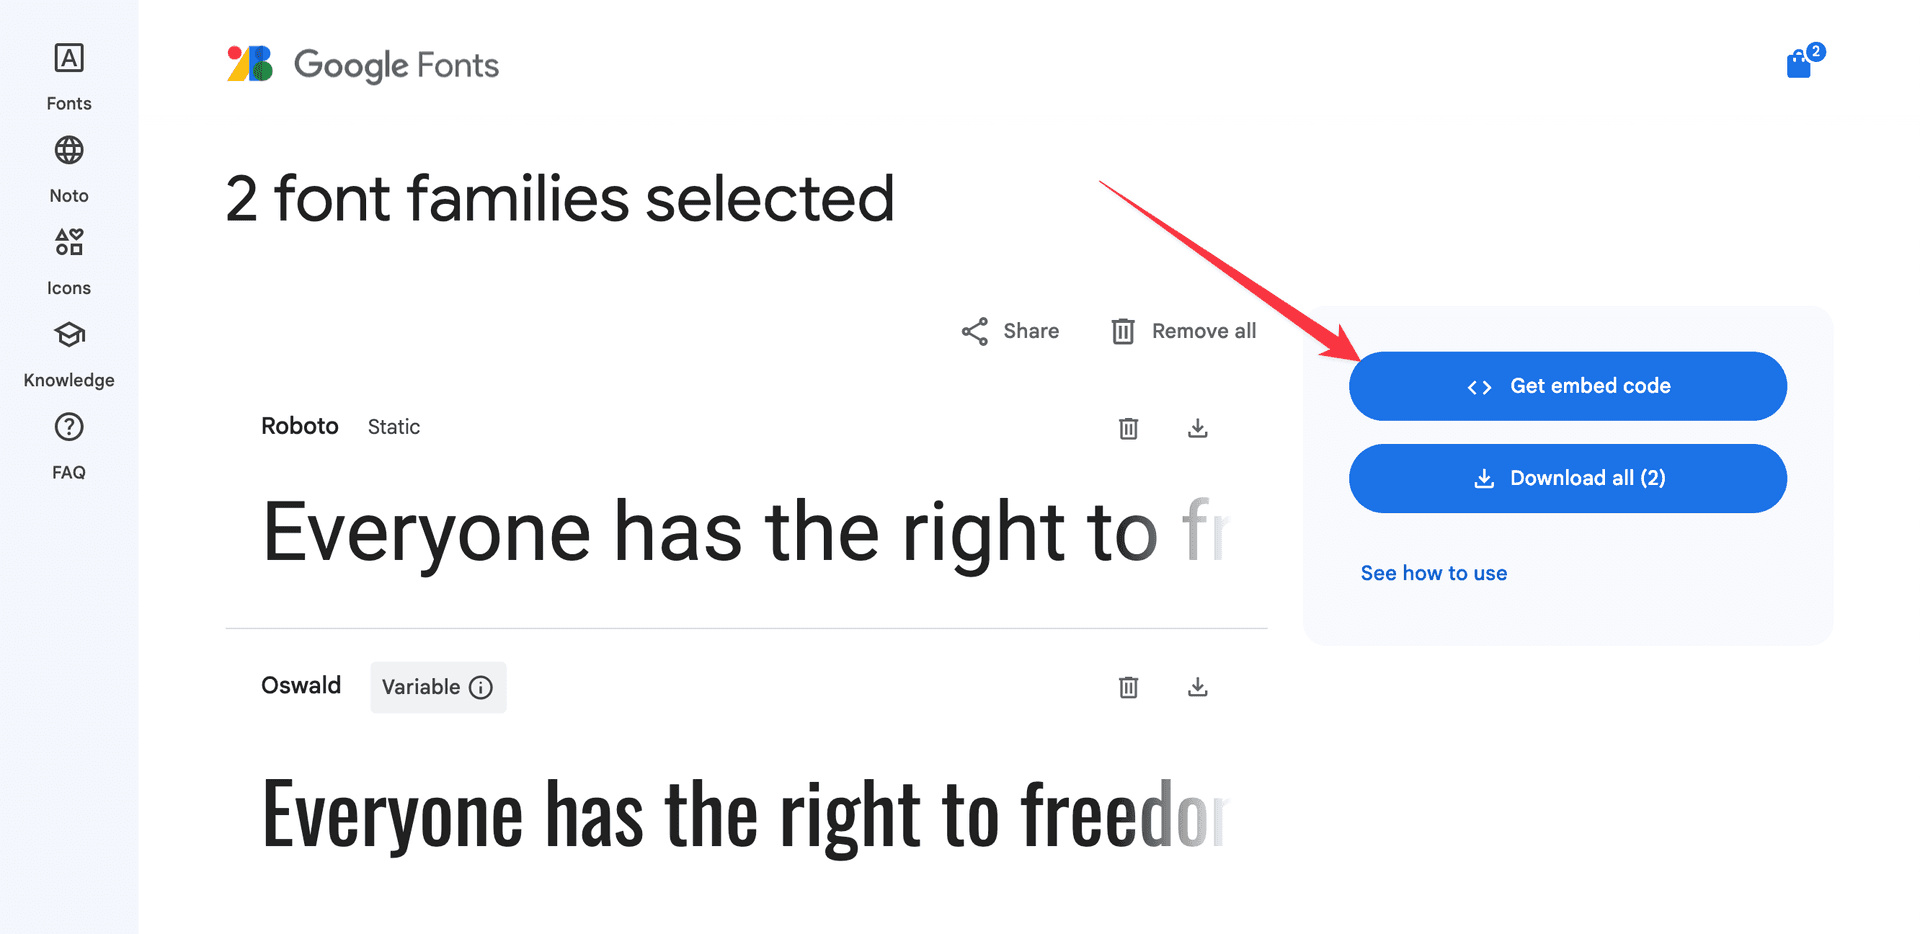
- Select the font weights and styles if you want and copy the code from the Web tab
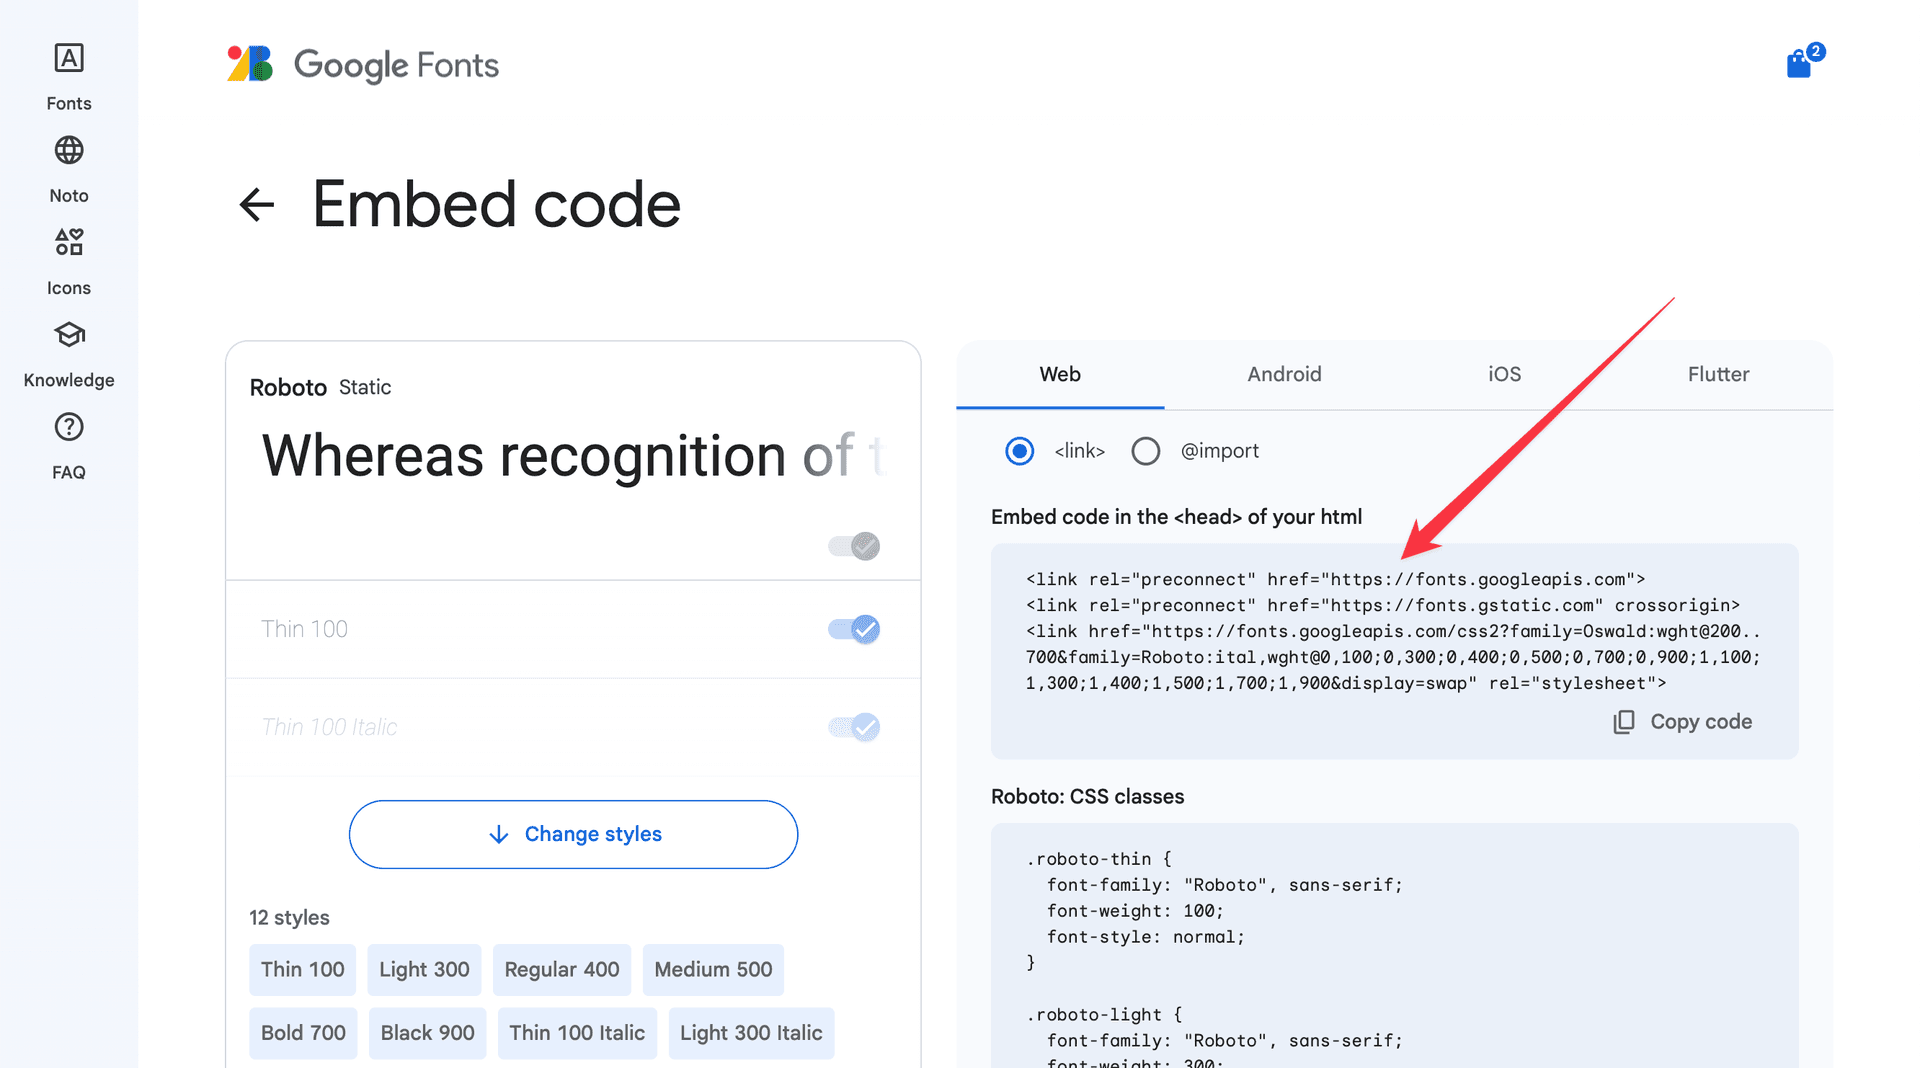
Add the following CSS code:
<link rel="preconnect" href="https://fonts.googleapis.com">
<link rel="preconnect" href="https://fonts.gstatic.com" crossorigin>
<link href="https://fonts.googleapis.com/css2?family=Oswald:wght@200..700&family=Roboto:ital,wght@0,100;0,300;0,400;0,500;0,700;0,900;1,100;1,300;1,400;1,500;1,700;1,900&display=swap" rel="stylesheet">

<style>
  :root {
    --gh-font-body: "Roboto", sans-serif;
    --gh-font-heading: "Oswald", sans-serif;
  }
</style>
Set both “Heading font” and “Body font” to “Theme default” in Ghost Typography settings so Ghost does not load conflicting fonts.
Using Custom Font Files
If you want to use custom fonts that aren’t available on Google Fonts or if you prefer to host fonts yourself for better performance and privacy, you can add custom font files directly to your theme.
This method requires direct access to your theme files and basic knowledge of HTML and CSS. Make sure to back up your theme before making any changes.
Step 1: Prepare Font Files
First, make sure you have the font files in the correct formats. For maximum browser compatibility, you should have:
- .woff2 (Web Open Font Format 2) — modern browsers
- .woff (Web Open Font Format) — fallback for older browsers
You can convert your fonts using tools like Font Squirrel’s Webfont Generator or Transfonter.
Step 2: Edit Theme Files
- Download your the theme following the instructions in Editing Theme Code guide
- Create a new folder called
assets/fonts/if it doesn’t already exist - Upload your font files to this folder
Your folder structure should look like this:
essence/
├── assets/
│   ├── fonts/
│   │   ├── your-custom-font.woff2
│   │   ├── your-custom-font.woff
│   │   ├── your-custom-font-bold.woff2
│   │   └── your-custom-font-bold.woff
Step 3: Add Font Declarations
You’ll need to edit the default.hbs file to add your custom fonts:
- Open the
default.hbsfile in your code editor - Locate the
<head>section - Add your font declarations before the closing
</head>tag:
<head>
    <!-- Existing head content will be here -->

    <!-- Add your custom font declarations here -->
    <style>
        @font-face {
            font-family: 'YourCustomFont';
            src: url('{{asset "fonts/your-custom-font.woff2"}}') format('woff2'),
                 url('{{asset "fonts/your-custom-font.woff"}}') format('woff');
            font-weight: 400;
            font-style: normal;
            font-display: swap;
        }

        @font-face {
            font-family: 'YourCustomFont';
            src: url('{{asset "fonts/your-custom-font-bold.woff2"}}') format('woff2'),
                 url('{{asset "fonts/your-custom-font-bold.woff"}}') format('woff');
            font-weight: 700;
            font-style: normal;
            font-display: swap;
        }

        :root {
            --gh-font-body: 'YourCustomFont', sans-serif;
            --gh-font-heading: 'YourCustomFont', sans-serif;
        }
    </style>
</head>- Save the file, re-zip your theme, and upload it following the instructions in Editing Theme Code guide
When modifying theme files directly, be aware that theme updates may overwrite your changes. See Updating Theme guide for how to preserve custom modifications during updates.
Scope
Ghost offers multiple ways to customize the fonts used in your theme. You can either use Ghost’s built-in typography settings or add custom fonts manually.
Default fonts
By default, Scope uses the self-hosted font named Geist. It is a modern sans-serif font carefully crafted for all screens, providing excellent readability and a clean aesthetic.
Ghost Typography Settings
Ghost provides built-in typography customization through the admin panel. Here’s how to access these settings:
- Go to Settings → Site → Design & branding
- Click Customize
- Change fonts in Typography section
You can easily change both heading and body fonts using the native Ghost interface.
However, if you want to use custom fonts that are not available in Ghost’s curated selection, you can add them manually using Google Fonts or other sources.
To use custom fonts, make sure both “Heading font” and “Body font” are set to “Theme default” in Ghost’s Typography settings. This prevents Ghost from loading its fonts and allows your custom fonts to work properly.
Using Custom Google Fonts
If you want to use Google Fonts instead, follow these steps:
Code Injection is required to add custom CSS.
- Open the Google Fonts website and select the font you want to use. For example, we will use Roboto for body and Oswald for headings.
- Add these fonts to collection using the Get font button
- Click on the Get embed code button
- Select the font weights and styles if you want and copy the code from the Web tab
Add the following CSS code:
<link rel="preconnect" href="https://fonts.googleapis.com">
<link rel="preconnect" href="https://fonts.gstatic.com" crossorigin>
<link href="https://fonts.googleapis.com/css2?family=Oswald:wght@200..700&family=Roboto:ital,wght@0,100;0,300;0,400;0,500;0,700;0,900;1,100;1,300;1,400;1,500;1,700;1,900&display=swap" rel="stylesheet">

<style>
  :root {
    --gh-font-body: "Roboto", sans-serif;
    --gh-font-heading: "Oswald", sans-serif;
  }
</style>
Using Custom Font Files
If you want to use custom fonts that aren’t available on Google Fonts or if you prefer to host fonts yourself for better performance and privacy, you can add custom font files directly to your theme.
This method requires direct access to your theme files and basic knowledge of HTML and CSS. Make sure to back up your theme before making any changes.
Step 1: Prepare Font Files
First, make sure you have the font files in the correct formats. For maximum browser compatibility, you should have:
- .woff2 (Web Open Font Format 2) - Modern browsers
- .woff (Web Open Font Format) - Fallback for older browsers
You can convert your fonts to these formats using tools like Font Squirrel’s Webfont Generator or Transfonter.
Step 2: Edit Theme Files
- Download your the theme following the instructions in Editing Theme Code guide
- Create a new folder called
assets/fonts/if it doesn’t already exist - Upload your font files to this folder
Your folder structure should look like this:
scope/
├── assets/
│   ├── fonts/
│   │   ├── your-custom-font.woff2
│   │   ├── your-custom-font.woff
│   │   ├── your-custom-font-bold.woff2
│   │   └── your-custom-font-bold.woff
Step 3: Add Font Declarations
Edit the default.hbs file to add your custom fonts, or use Code Injection to add the @font-face declarations and CSS variables.
Thoughts
Ghost offers multiple ways to customize the fonts used in your theme. You can either use Ghost’s built-in typography settings or add custom fonts manually.
Default fonts
By default, the theme uses the self-hosted font named Geist. It is a modern sans-serif font carefully crafted for all screens.
Ghost Typography Settings
Ghost provides built-in typography customization through the admin panel. Here’s how to access these settings:
- Go to Settings → Site → Design & branding
- Click Customize
- Change fonts in Typography section
You can easily change both heading and body fonts using the native Ghost interface.
However, if you want to use custom fonts that are not available in Ghost’s curated selection, you can add them manually using Google Fonts or other sources.
To use custom fonts, make sure both “Heading font” and “Body font” are set to “Theme default” in Ghost’s Typography settings. This prevents Ghost from loading its fonts and allows your custom fonts to work properly.
Using Custom Google Fonts
Code Injection is required to add custom CSS.
- Open the Google Fonts website and select the font you want to use. For example, we will use Roboto for body and Oswald for headings.
- Add these fonts to collection using the Get font button
- Click on the Get embed code button
- Select the font weights and styles if you want and copy the code from the Web tab
Add the following CSS code:
<link rel="preconnect" href="https://fonts.googleapis.com">
<link rel="preconnect" href="https://fonts.gstatic.com" crossorigin>
<link href="https://fonts.googleapis.com/css2?family=Oswald:wght@200..700&family=Roboto:ital,wght@0,100;0,300;0,400;0,500;0,700;0,900;1,100;1,300;1,400;1,500;1,700;1,900&display=swap" rel="stylesheet">

<style>
  :root {
    --gh-font-body: "Roboto", sans-serif;
    --gh-font-heading: "Oswald", sans-serif;
  }
</style>
Using Custom Font Files
If you want to use custom fonts that aren’t available on Google Fonts or if you prefer to host fonts yourself for better performance and privacy, you can add custom font files directly to your theme.
This method requires direct access to your theme files and basic knowledge of HTML and CSS. Make sure to back up your theme before making any changes.
Step 1: Prepare Font Files
First, make sure you have the font files in the correct formats. For maximum browser compatibility, you should have:
- .woff2 (Web Open Font Format 2) - Modern browsers
- .woff (Web Open Font Format) - Fallback for older browsers
You can convert your fonts to these formats using tools like Font Squirrel’s Webfont Generator or Transfonter.
Step 2: Edit Theme Files
- Download your the theme following the instructions in Editing Theme Code guide
- Create a new folder called
assets/fonts/if it doesn’t already exist - Upload your font files to this folder
Your folder structure should look like this:
thoughts/
├── assets/
│   ├── fonts/
│   │   ├── your-custom-font.woff2
│   │   ├── your-custom-font.woff
│   │   ├── your-custom-font-bold.woff2
│   │   └── your-custom-font-bold.woff
Step 3: Add Font Declarations
You’ll need to edit the default.hbs file to add your custom fonts:
- Open the
default.hbsfile in your code editor - Locate the
<head>section - Add your font declarations before the closing
</head>tag:
<head>
    <!-- Existing head content will be here -->

    <!-- Add your custom font declarations here -->
    <style>
        @font-face {
            font-family: 'YourCustomFont';
            src: url('{{asset "fonts/your-custom-font.woff2"}}') format('woff2'),
                 url('{{asset "fonts/your-custom-font.woff"}}') format('woff');
            font-weight: 400;
            font-style: normal;
            font-display: swap;
        }

        @font-face {
            font-family: 'YourCustomFont';
            src: url('{{asset "fonts/your-custom-font-bold.woff2"}}') format('woff2'),
                 url('{{asset "fonts/your-custom-font-bold.woff"}}') format('woff');
            font-weight: 700;
            font-style: normal;
            font-display: swap;
        }

        /* Add more @font-face declarations for additional font weights and styles */

        :root {
            --gh-font-body: 'YourCustomFont', sans-serif;
            --gh-font-heading: 'YourCustomFont', sans-serif;
        }
    </style>
</head>- Save the file, re-zip your theme, and upload it following the instructions in Editing Theme Code guide
When modifying theme files directly, be aware that theme updates may overwrite your changes. See Updating Theme guide for how to preserve custom modifications during updates.
Feed
Ghost offers multiple ways to customize the fonts used in your theme. You can either use Ghost’s built-in typography settings or add custom fonts manually.
Default fonts
By default, the theme uses the self-hosted font named Geist. It is a modern sans-serif font carefully crafted for all screens.
Ghost Typography Settings
Ghost provides built-in typography customization through the admin panel. Here’s how to access these settings:
- Go to Settings → Site → Design & branding
- Click Customize
- Change fonts in Typography section
You can easily change both heading and body fonts using the native Ghost interface.
However, if you want to use custom fonts that are not available in Ghost’s curated selection, you can add them manually using Google Fonts or other sources.
To use custom fonts, make sure both “Heading font” and “Body font” are set to “Theme default” in Ghost’s Typography settings. This prevents Ghost from loading its fonts and allows your custom fonts to work properly.
Using Custom Google Fonts
Code Injection is required to add custom CSS.
- Open the Google Fonts website and select the font you want to use. For example, we will use Roboto for body and Oswald for headings.
- Add these fonts to collection using the Get font button
- Click on the Get embed code button
- Select the font weights and styles if you want and copy the code from the Web tab
Add the following CSS code:
<link rel="preconnect" href="https://fonts.googleapis.com">
<link rel="preconnect" href="https://fonts.gstatic.com" crossorigin>
<link href="https://fonts.googleapis.com/css2?family=Oswald:wght@200..700&family=Roboto:ital,wght@0,100;0,300;0,400;0,500;0,700;0,900;1,100;1,300;1,400;1,500;1,700;1,900&display=swap" rel="stylesheet">

<style>
  :root {
    --gh-font-body: "Roboto", sans-serif;
    --gh-font-heading: "Oswald", sans-serif;
  }
</style>
Using Custom Font Files
If you want to use custom fonts that aren’t available on Google Fonts or if you prefer to host fonts yourself for better performance and privacy, you can add custom font files directly to your theme.
This method requires direct access to your theme files and basic knowledge of HTML and CSS. Make sure to back up your theme before making any changes.
Step 1: Prepare Font Files
First, make sure you have the font files in the correct formats. For maximum browser compatibility, you should have:
- .woff2 (Web Open Font Format 2) - Modern browsers
- .woff (Web Open Font Format) - Fallback for older browsers
You can convert your fonts to these formats using tools like Font Squirrel’s Webfont Generator or Transfonter.
Step 2: Edit Theme Files
- Download your the theme following the instructions in Editing Theme Code guide
- Create a new folder called
assets/fonts/if it doesn’t already exist - Upload your font files to this folder
Your folder structure should look like this:
feed/
├── assets/
│   ├── fonts/
│   │   ├── your-custom-font.woff2
│   │   ├── your-custom-font.woff
│   │   ├── your-custom-font-bold.woff2
│   │   └── your-custom-font-bold.woff
Step 3: Add Font Declarations
You’ll need to edit the default.hbs file to add your custom fonts:
- Open the
default.hbsfile in your code editor - Locate the
<head>section - Add your font declarations before the closing
</head>tag:
<head>
    <!-- Existing head content will be here -->

    <!-- Add your custom font declarations here -->
    <style>
        @font-face {
            font-family: 'YourCustomFont';
            src: url('{{asset "fonts/your-custom-font.woff2"}}') format('woff2'),
                 url('{{asset "fonts/your-custom-font.woff"}}') format('woff');
            font-weight: 400;
            font-style: normal;
            font-display: swap;
        }

        @font-face {
            font-family: 'YourCustomFont';
            src: url('{{asset "fonts/your-custom-font-bold.woff2"}}') format('woff2'),
                 url('{{asset "fonts/your-custom-font-bold.woff"}}') format('woff');
            font-weight: 700;
            font-style: normal;
            font-display: swap;
        }

        /* Add more @font-face declarations for additional font weights and styles */

        :root {
            --gh-font-body: 'YourCustomFont', sans-serif;
            --gh-font-heading: 'YourCustomFont', sans-serif;
        }
    </style>
</head>- Save the file, re-zip your theme, and upload it following the instructions in Editing Theme Code guide
When modifying theme files directly, be aware that theme updates may overwrite your changes. See Updating Theme guide for how to preserve custom modifications during updates.
Moment
Ghost offers multiple ways to customize the fonts used in your theme. You can either use Ghost’s built-in typography settings or add custom fonts manually.
Default fonts
By default, the theme uses the self-hosted font named Geist. It is a modern sans-serif font carefully crafted for all screens.
Ghost Typography Settings
Ghost provides built-in typography customization through the admin panel. Here’s how to access these settings:
- Go to Settings → Site → Design & branding
- Click Customize
- Change fonts in Typography section
You can easily change both heading and body fonts using the native Ghost interface.
However, if you want to use custom fonts that are not available in Ghost’s curated selection, you can add them manually using Google Fonts or other sources.
To use custom fonts, make sure both “Heading font” and “Body font” are set to “Theme default” in Ghost’s Typography settings. This prevents Ghost from loading its fonts and allows your custom fonts to work properly.
Using Custom Google Fonts
Code Injection is required to add custom CSS.
- Open the Google Fonts website and select the font you want to use. For example, we will use Roboto for body and Oswald for headings.
- Add these fonts to collection using the Get font button
- Click on the Get embed code button
- Select the font weights and styles if you want and copy the code from the Web tab
Add the following CSS code:
<link rel="preconnect" href="https://fonts.googleapis.com">
<link rel="preconnect" href="https://fonts.gstatic.com" crossorigin>
<link href="https://fonts.googleapis.com/css2?family=Oswald:wght@200..700&family=Roboto:ital,wght@0,100;0,300;0,400;0,500;0,700;0,900;1,100;1,300;1,400;1,500;1,700;1,900&display=swap" rel="stylesheet">

<style>
  :root {
    --gh-font-body: "Roboto", sans-serif;
    --gh-font-heading: "Oswald", sans-serif;
  }
</style>
Using Custom Font Files
If you want to use custom fonts that aren’t available on Google Fonts or if you prefer to host fonts yourself for better performance and privacy, you can add custom font files directly to your theme.
This method requires direct access to your theme files and basic knowledge of HTML and CSS. Make sure to back up your theme before making any changes.
Step 1: Prepare Font Files
First, make sure you have the font files in the correct formats. For maximum browser compatibility, you should have:
- .woff2 (Web Open Font Format 2) - Modern browsers
- .woff (Web Open Font Format) - Fallback for older browsers
You can convert your fonts to these formats using tools like Font Squirrel’s Webfont Generator or Transfonter.
Step 2: Edit Theme Files
- Download your the theme following the instructions in Editing Theme Code guide
- Create a new folder called
assets/fonts/if it doesn’t already exist - Upload your font files to this folder
Your folder structure should look like this:
moment/
├── assets/
│   ├── fonts/
│   │   ├── your-custom-font.woff2
│   │   ├── your-custom-font.woff
│   │   ├── your-custom-font-bold.woff2
│   │   └── your-custom-font-bold.woff
Step 3: Add Font Declarations
You’ll need to edit the default.hbs file to add your custom fonts:
- Open the
default.hbsfile in your code editor - Locate the
<head>section - Add your font declarations before the closing
</head>tag:
<head>
    <!-- Existing head content will be here -->

    <!-- Add your custom font declarations here -->
    <style>
        @font-face {
            font-family: 'YourCustomFont';
            src: url('{{asset "fonts/your-custom-font.woff2"}}') format('woff2'),
                 url('{{asset "fonts/your-custom-font.woff"}}') format('woff');
            font-weight: 400;
            font-style: normal;
            font-display: swap;
        }

        @font-face {
            font-family: 'YourCustomFont';
            src: url('{{asset "fonts/your-custom-font-bold.woff2"}}') format('woff2'),
                 url('{{asset "fonts/your-custom-font-bold.woff"}}') format('woff');
            font-weight: 700;
            font-style: normal;
            font-display: swap;
        }

        /* Add more @font-face declarations for additional font weights and styles */

        :root {
            --gh-font-body: 'YourCustomFont', sans-serif;
            --gh-font-heading: 'YourCustomFont', sans-serif;
        }
    </style>
</head>- Save the file, re-zip your theme, and upload it following the instructions in Editing Theme Code guide
When modifying theme files directly, be aware that theme updates may overwrite your changes. See Updating Theme guide for how to preserve custom modifications during updates.
Aspect
Ghost offers multiple ways to customize the fonts used in your theme. You can either use Ghost’s built-in typography settings or add custom fonts manually.
Default fonts
By default, the theme uses the self-hosted font named Geist. It is a modern sans-serif font carefully crafted for all screens.
Ghost Typography Settings
Ghost provides built-in typography customization through the admin panel. Here’s how to access these settings:
- Go to Settings → Site → Design & branding
- Click Customize
- Change fonts in Typography section
You can easily change both heading and body fonts using the native Ghost interface.
However, if you want to use custom fonts that are not available in Ghost’s curated selection, you can add them manually using Google Fonts or other sources.
To use custom fonts, make sure both “Heading font” and “Body font” are set to “Theme default” in Ghost’s Typography settings. This prevents Ghost from loading its fonts and allows your custom fonts to work properly.
Using Custom Google Fonts
Code Injection is required to add custom CSS.
- Open the Google Fonts website and select the font you want to use. For example, we will use Roboto for body and Oswald for headings.
- Add these fonts to collection using the Get font button
- Click on the Get embed code button
- Select the font weights and styles if you want and copy the code from the Web tab
Add the following CSS code:
<link rel="preconnect" href="https://fonts.googleapis.com">
<link rel="preconnect" href="https://fonts.gstatic.com" crossorigin>
<link href="https://fonts.googleapis.com/css2?family=Oswald:wght@200..700&family=Roboto:ital,wght@0,100;0,300;0,400;0,500;0,700;0,900;1,100;1,300;1,400;1,500;1,700;1,900&display=swap" rel="stylesheet">

<style>
  :root {
    --gh-font-body: "Roboto", sans-serif;
    --gh-font-heading: "Oswald", sans-serif;
  }
</style>
Using Custom Font Files
If you want to use custom fonts that aren’t available on Google Fonts or if you prefer to host fonts yourself for better performance and privacy, you can add custom font files directly to your theme.
This method requires direct access to your theme files and basic knowledge of HTML and CSS. Make sure to back up your theme before making any changes.
Step 1: Prepare Font Files
First, make sure you have the font files in the correct formats. For maximum browser compatibility, you should have:
- .woff2 (Web Open Font Format 2) - Modern browsers
- .woff (Web Open Font Format) - Fallback for older browsers
You can convert your fonts to these formats using tools like Font Squirrel’s Webfont Generator or Transfonter.
Step 2: Edit Theme Files
- Download your the theme following the instructions in Editing Theme Code guide
- Create a new folder called
assets/fonts/if it doesn’t already exist - Upload your font files to this folder
Your folder structure should look like this:
aspect/
├── assets/
│   ├── fonts/
│   │   ├── your-custom-font.woff2
│   │   ├── your-custom-font.woff
│   │   ├── your-custom-font-bold.woff2
│   │   └── your-custom-font-bold.woff
Step 3: Add Font Declarations
You’ll need to edit the default.hbs file to add your custom fonts:
- Open the
default.hbsfile in your code editor - Locate the
<head>section - Add your font declarations before the closing
</head>tag:
<head>
    <!-- Existing head content will be here -->

    <!-- Add your custom font declarations here -->
    <style>
        @font-face {
            font-family: 'YourCustomFont';
            src: url('{{asset "fonts/your-custom-font.woff2"}}') format('woff2'),
                 url('{{asset "fonts/your-custom-font.woff"}}') format('woff');
            font-weight: 400;
            font-style: normal;
            font-display: swap;
        }

        @font-face {
            font-family: 'YourCustomFont';
            src: url('{{asset "fonts/your-custom-font-bold.woff2"}}') format('woff2'),
                 url('{{asset "fonts/your-custom-font-bold.woff"}}') format('woff');
            font-weight: 700;
            font-style: normal;
            font-display: swap;
        }

        /* Add more @font-face declarations for additional font weights and styles */

        :root {
            --gh-font-body: 'YourCustomFont', sans-serif;
            --gh-font-heading: 'YourCustomFont', sans-serif;
        }
    </style>
</head>- Save the file, re-zip your theme, and upload it following the instructions in Editing Theme Code guide
When modifying theme files directly, be aware that theme updates may overwrite your changes. See Updating Theme guide for how to preserve custom modifications during updates.
OnFlow
Ghost offers multiple ways to customize the fonts used in your theme. You can either use Ghost’s built-in typography settings or add custom fonts manually.
Default fonts
By default, the theme uses the self-hosted font named Geist. It is a modern sans-serif font carefully crafted for all screens.
Ghost Typography Settings
Ghost provides built-in typography customization through the admin panel. Here’s how to access these settings:
- Go to Settings → Site → Design & branding
- Click Customize
- Change fonts in Typography section
You can easily change both heading and body fonts using the native Ghost interface.
However, if you want to use custom fonts that are not available in Ghost’s curated selection, you can add them manually using Google Fonts or other sources.
To use custom fonts, make sure both “Heading font” and “Body font” are set to “Theme default” in Ghost’s Typography settings. This prevents Ghost from loading its fonts and allows your custom fonts to work properly.
Using Custom Google Fonts
Code Injection is required to add custom CSS.
- Open the Google Fonts website and select the font you want to use. For example, we will use Roboto for body and Oswald for headings.
- Add these fonts to collection using the Get font button
- Click on the Get embed code button
- Select the font weights and styles if you want and copy the code from the Web tab
Add the following CSS code:
<link rel="preconnect" href="https://fonts.googleapis.com">
<link rel="preconnect" href="https://fonts.gstatic.com" crossorigin>
<link href="https://fonts.googleapis.com/css2?family=Oswald:wght@200..700&family=Roboto:ital,wght@0,100;0,300;0,400;0,500;0,700;0,900;1,100;1,300;1,400;1,500;1,700;1,900&display=swap" rel="stylesheet">

<style>
  :root {
    --gh-font-body: "Roboto", sans-serif;
    --gh-font-heading: "Oswald", sans-serif;
  }
</style>
Using Custom Font Files
If you want to use custom fonts that aren’t available on Google Fonts or if you prefer to host fonts yourself for better performance and privacy, you can add custom font files directly to your theme.
This method requires direct access to your theme files and basic knowledge of HTML and CSS. Make sure to back up your theme before making any changes.
Step 1: Prepare Font Files
First, make sure you have the font files in the correct formats. For maximum browser compatibility, you should have:
- .woff2 (Web Open Font Format 2) - Modern browsers
- .woff (Web Open Font Format) - Fallback for older browsers
You can convert your fonts to these formats using tools like Font Squirrel’s Webfont Generator or Transfonter.
Step 2: Edit Theme Files
- Download your the theme following the instructions in Editing Theme Code guide
- Create a new folder called
assets/fonts/if it doesn’t already exist - Upload your font files to this folder
Your folder structure should look like this:
onflow/
├── assets/
│   ├── fonts/
│   │   ├── your-custom-font.woff2
│   │   ├── your-custom-font.woff
│   │   ├── your-custom-font-bold.woff2
│   │   └── your-custom-font-bold.woff
Step 3: Add Font Declarations
You’ll need to edit the default.hbs file to add your custom fonts:
- Open the
default.hbsfile in your code editor - Locate the
<head>section - Add your font declarations before the closing
</head>tag:
<head>
    <!-- Existing head content will be here -->

    <!-- Add your custom font declarations here -->
    <style>
        @font-face {
            font-family: 'YourCustomFont';
            src: url('{{asset "fonts/your-custom-font.woff2"}}') format('woff2'),
                 url('{{asset "fonts/your-custom-font.woff"}}') format('woff');
            font-weight: 400;
            font-style: normal;
            font-display: swap;
        }

        @font-face {
            font-family: 'YourCustomFont';
            src: url('{{asset "fonts/your-custom-font-bold.woff2"}}') format('woff2'),
                 url('{{asset "fonts/your-custom-font-bold.woff"}}') format('woff');
            font-weight: 700;
            font-style: normal;
            font-display: swap;
        }

        /* Add more @font-face declarations for additional font weights and styles */

        :root {
            --gh-font-body: 'YourCustomFont', sans-serif;
            --gh-font-heading: 'YourCustomFont', sans-serif;
        }
    </style>
</head>- Save the file, re-zip your theme, and upload it following the instructions in Editing Theme Code guide
When modifying theme files directly, be aware that theme updates may overwrite your changes. See Updating Theme guide for how to preserve custom modifications during updates.
Thesis
Ghost offers multiple ways to customize the fonts used in your theme. You can either use Ghost’s built-in typography settings or add custom fonts manually.
Default fonts
By default, the theme uses the self-hosted font named Geist. It is a modern sans-serif font carefully crafted for all screens.
Ghost Typography Settings
Ghost provides built-in typography customization through the admin panel. Here’s how to access these settings:
- Go to Settings → Site → Design & branding
- Click Customize
- Change fonts in Typography section
You can easily change both heading and body fonts using the native Ghost interface.
However, if you want to use custom fonts that are not available in Ghost’s curated selection, you can add them manually using Google Fonts or other sources.
To use custom fonts, make sure both “Heading font” and “Body font” are set to “Theme default” in Ghost’s Typography settings. This prevents Ghost from loading its fonts and allows your custom fonts to work properly.
Using Custom Google Fonts
Code Injection is required to add custom CSS.
- Open the Google Fonts website and select the font you want to use. For example, we will use Roboto for body and Oswald for headings.
- Add these fonts to collection using the Get font button
- Click on the Get embed code button
- Select the font weights and styles if you want and copy the code from the Web tab
Add the following CSS code:
<link rel="preconnect" href="https://fonts.googleapis.com">
<link rel="preconnect" href="https://fonts.gstatic.com" crossorigin>
<link href="https://fonts.googleapis.com/css2?family=Oswald:wght@200..700&family=Roboto:ital,wght@0,100;0,300;0,400;0,500;0,700;0,900;1,100;1,300;1,400;1,500;1,700;1,900&display=swap" rel="stylesheet">

<style>
  :root {
    --gh-font-body: "Roboto", sans-serif;
    --gh-font-heading: "Oswald", sans-serif;
  }
</style>
Using Custom Font Files
If you want to use custom fonts that aren’t available on Google Fonts or if you prefer to host fonts yourself for better performance and privacy, you can add custom font files directly to your theme.
This method requires direct access to your theme files and basic knowledge of HTML and CSS. Make sure to back up your theme before making any changes.
Step 1: Prepare Font Files
First, make sure you have the font files in the correct formats. For maximum browser compatibility, you should have:
- .woff2 (Web Open Font Format 2) - Modern browsers
- .woff (Web Open Font Format) - Fallback for older browsers
You can convert your fonts to these formats using tools like Font Squirrel’s Webfont Generator or Transfonter.
Step 2: Edit Theme Files
- Download your the theme following the instructions in Editing Theme Code guide
- Create a new folder called
assets/fonts/if it doesn’t already exist - Upload your font files to this folder
Your folder structure should look like this:
thesis/
├── assets/
│   ├── fonts/
│   │   ├── your-custom-font.woff2
│   │   ├── your-custom-font.woff
│   │   ├── your-custom-font-bold.woff2
│   │   └── your-custom-font-bold.woff
Step 3: Add Font Declarations
You’ll need to edit the default.hbs file to add your custom fonts:
- Open the
default.hbsfile in your code editor - Locate the
<head>section - Add your font declarations before the closing
</head>tag:
<head>
    <!-- Existing head content will be here -->

    <!-- Add your custom font declarations here -->
    <style>
        @font-face {
            font-family: 'YourCustomFont';
            src: url('{{asset "fonts/your-custom-font.woff2"}}') format('woff2'),
                 url('{{asset "fonts/your-custom-font.woff"}}') format('woff');
            font-weight: 400;
            font-style: normal;
            font-display: swap;
        }

        @font-face {
            font-family: 'YourCustomFont';
            src: url('{{asset "fonts/your-custom-font-bold.woff2"}}') format('woff2'),
                 url('{{asset "fonts/your-custom-font-bold.woff"}}') format('woff');
            font-weight: 700;
            font-style: normal;
            font-display: swap;
        }

        /* Add more @font-face declarations for additional font weights and styles */

        :root {
            --gh-font-body: 'YourCustomFont', sans-serif;
            --gh-font-heading: 'YourCustomFont', sans-serif;
        }
    </style>
</head>- Save the file, re-zip your theme, and upload it following the instructions in Editing Theme Code guide
When modifying theme files directly, be aware that theme updates may overwrite your changes. See Updating Theme guide for how to preserve custom modifications during updates.
Format
Ghost offers multiple ways to customize the fonts used in your theme. You can either use Ghost’s built-in typography settings or add custom fonts manually.
Default fonts
By default, the theme uses the self-hosted font named Geist. It is a modern sans-serif font carefully crafted for all screens.
Ghost Typography Settings
Ghost provides built-in typography customization through the admin panel. Here’s how to access these settings:
- Go to Settings → Site → Design & branding
- Click Customize
- Change fonts in Typography section
You can easily change both heading and body fonts using the native Ghost interface.
However, if you want to use custom fonts that are not available in Ghost’s curated selection, you can add them manually using Google Fonts or other sources.
To use custom fonts, make sure both “Heading font” and “Body font” are set to “Theme default” in Ghost’s Typography settings. This prevents Ghost from loading its fonts and allows your custom fonts to work properly.
Using Custom Google Fonts
Code Injection is required to add custom CSS.
- Open the Google Fonts website and select the font you want to use. For example, we will use Roboto for body and Oswald for headings.
- Add these fonts to collection using the Get font button
- Click on the Get embed code button
- Select the font weights and styles if you want and copy the code from the Web tab
Add the following CSS code:
<link rel="preconnect" href="https://fonts.googleapis.com">
<link rel="preconnect" href="https://fonts.gstatic.com" crossorigin>
<link href="https://fonts.googleapis.com/css2?family=Oswald:wght@200..700&family=Roboto:ital,wght@0,100;0,300;0,400;0,500;0,700;0,900;1,100;1,300;1,400;1,500;1,700;1,900&display=swap" rel="stylesheet">

<style>
  :root {
    --gh-font-body: "Roboto", sans-serif;
    --gh-font-heading: "Oswald", sans-serif;
  }
</style>
Using Custom Font Files
If you want to use custom fonts that aren’t available on Google Fonts or if you prefer to host fonts yourself for better performance and privacy, you can add custom font files directly to your theme.
This method requires direct access to your theme files and basic knowledge of HTML and CSS. Make sure to back up your theme before making any changes.
Step 1: Prepare Font Files
First, make sure you have the font files in the correct formats. For maximum browser compatibility, you should have:
- .woff2 (Web Open Font Format 2) - Modern browsers
- .woff (Web Open Font Format) - Fallback for older browsers
You can convert your fonts to these formats using tools like Font Squirrel’s Webfont Generator or Transfonter.
Step 2: Edit Theme Files
- Download your the theme following the instructions in Editing Theme Code guide
- Create a new folder called
assets/fonts/if it doesn’t already exist - Upload your font files to this folder
Your folder structure should look like this:
format/
├── assets/
│   ├── fonts/
│   │   ├── your-custom-font.woff2
│   │   ├── your-custom-font.woff
│   │   ├── your-custom-font-bold.woff2
│   │   └── your-custom-font-bold.woff
Step 3: Add Font Declarations
You’ll need to edit the default.hbs file to add your custom fonts:
- Open the
default.hbsfile in your code editor - Locate the
<head>section - Add your font declarations before the closing
</head>tag:
<head>
    <!-- Existing head content will be here -->

    <!-- Add your custom font declarations here -->
    <style>
        @font-face {
            font-family: 'YourCustomFont';
            src: url('{{asset "fonts/your-custom-font.woff2"}}') format('woff2'),
                 url('{{asset "fonts/your-custom-font.woff"}}') format('woff');
            font-weight: 400;
            font-style: normal;
            font-display: swap;
        }

        @font-face {
            font-family: 'YourCustomFont';
            src: url('{{asset "fonts/your-custom-font-bold.woff2"}}') format('woff2'),
                 url('{{asset "fonts/your-custom-font-bold.woff"}}') format('woff');
            font-weight: 700;
            font-style: normal;
            font-display: swap;
        }

        /* Add more @font-face declarations for additional font weights and styles */

        :root {
            --gh-font-body: 'YourCustomFont', sans-serif;
            --gh-font-heading: 'YourCustomFont', sans-serif;
        }
    </style>
</head>- Save the file, re-zip your theme, and upload it following the instructions in Editing Theme Code guide
When modifying theme files directly, be aware that theme updates may overwrite your changes. See Updating Theme guide for how to preserve custom modifications during updates.